Introduction
In this tutorial, I will be showing you how to create a basic Windows Forms application using C# in Visual Studio 2012. If you have an earlier version of Visual Studio, or a different edition, don't worry. Many of the steps are very similar and some are even identical.Creating a New Windows Forms Application
Before we get started, a couple basic concepts if you're new to Visual Studio:
- A project is a collection of source code files and resources (configuration files, images, etc.)
- A solution is a collection of one or more projects.
To create a new Windows Forms application:
- Open up Visual Studio
- Click on File
- Hover over New
- Click Project

When the New Project window is displayed, you should make sure you are under C# as the language. Then, you should do the following:- Verify you have Windows Forms Application selected
- Change the name of the project to something meaningful
- [optional] Select the Browse button and move the location of the project to some location you want to keep your solution.
- Click the OK button

This will generate the configuration and setup files necessary for your solution. You should now see the basic Design View for a Windows Forms application as the largest area in the visible interface. Before we move on, I want you to add one more thing. You need the toolbox, so we can actually add items to the form. If you already see it, then ignore these steps:
- Go to View
- Click Toolbox

Usually, I like to dock my toolbox as a tab along with Solution Explorer. Visual Studio has kind of a strange docking mechanism that you have to get used to. Click and drag the Toolbox that appears over the Solution Explorer and then hover over the center docking control and release the mouse. It should look something like this (note I've moved my tabs around a bit.)

Now, there are four major "parts" I want you to be aware of are:
- The Design View
- The Solution Explorer
- The Toolbox
- The Properties Window
The Solution Explorer contains the projects in your solution. You'll start out with one project, and it is often the case that you will only have one projects, even for many medium sized software applications you'll work on.
The Toolbox, in the docking format I selected, is available by clicking on the botton tab to switch back and forth between our Solution Explorer and Toolbox. It contains the controls that we can add to our form.
The Properties Window contains various properties of a control, such as the programmatic name (the variable's identifier), the display text, the color, styles, and many others. This window is also where you can view various events associated with the various user controls.
A Simple Example with a Button
Let's create a very simple application that simply allows the user to click a button, and says "Hello!" to the user.- From the Toolbox, drag a Button control (which is under All Windows Forms) onto the form in Design View.
- In the Properties Window, change the (Name) property to btnPressMe, which will be the name of the button used in the actual code we are about to write. It is a convention, but not required to start a button control identifier's name with btn.
- Change the Text property to Click Me
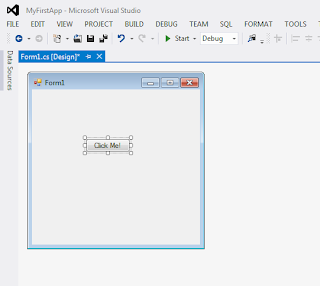
Now we have our basic button ready.
Build and Run the application as follows:
- Go to Build
- Click Build Solution
- Go to Debug
- Click Start without Debugging
This is because you haven't added an event handler to it. Close the executing Form1 application and go back into Visual Studio.
Adding an Event Handler to the Button
In Design View in Visual Studio, double click the button on the form. It will generate an event handler for the button and link it automatically. There are many different events to choose from. For buttons, the default event is Click. This code that you will write in this method is what will execute when a user of your application clicks the button.So what can we do? Since we don't know too much just yet, let's just have a Message Box pop up and tell the user "Hello!"
Make your button's event handler match the code inside the body of mine:
      private void btnPressMe_Click(object sender, EventArgs e)
        {
            MessageBox.Show("Hello!");
        }
Now build and run the application in the same manner you did before (Build --> Build Solution, then Debug --> Start without Debugging.)
See? If you click on the button, you now get a message!
No comments:
Post a Comment